
Injury Prevention Snowboarding: Your Complete Guide to Riding Safer & Longer
Crashes happen — serious injuries don’t have to. This evidence-based guide covers everything from MIPS helmets and wrist guards to ACL biomechanics, concussion protocols, avalanche basics, and the exact exercises that build an injury-resistant body.
The Numbers: Understanding Your Real Injury Risk
Before diving into prevention strategies, understanding the actual landscape of snowboarding injuries puts everything in context. Data from the National Electronic Injury Surveillance System and multiple peer-reviewed studies paint a clear picture: snowboarding carries real risk, but that risk is substantially modifiable through preparation, gear, and smart decision-making.
The most encouraging statistic is the 50% decrease in injury rates over the past decade — driven by improved equipment, better park design, increased safety awareness, and more structured progression culture. This proves that injury prevention genuinely works. The strategies in this guide are not theoretical; they have a documented track record of reducing both the frequency and severity of snowboarding injuries.
Understanding why you’re injured — not just that you are — is the foundation of effective prevention. Eighty-five percent of snowboard injuries result from falls. Of those, a significant proportion are preventable through better falling technique, appropriate gear, and improved physical preparation. Collisions account for around 8% of injuries — largely preventable through situational awareness and respect for resort rules. Learn the physics of why snowboarding creates injury risk in our article on why snowboarding is dangerous: centrifugal whip physics.
Common Snowboarding Injuries: Know Your Risks
Understanding the specific injuries you face — and the biomechanical mechanisms that cause them — is the first step to prevention. Snowboarding’s injury profile is distinct from skiing: the linked-feet stance and toe/heel edge system creates very specific loading patterns that favor upper-body injuries while being somewhat protective of certain knee injuries common in skiing.
Wrist Fractures & Sprains
Up to 30% of all injuries. FOOSH mechanism — Fall On OutStretched Hand. Scaphoid fractures are the most dangerous as they frequently go undiagnosed.
Shoulder Injuries
Dislocations, AC joint sprains, and rotator cuff tears. Most common from direct impacts and forward falls. Second most common upper-body injury category.
Concussion & TBI
Head trauma is the #1 injury in pediatric riders. Helmet use dramatically reduces severity. Concussions increased 50% from 2001–2023 as terrain park riding grew.
Ankle Injuries
Lateral ankle sprains and fractures, particularly at the talocalcaneal joint. Boot fit and binding angle are the primary preventive factors.
ACL & Ligament Tears
Less common than in skiing but significant. Board-linked falls and jump landings with locked knees are primary mechanisms. Preventable with strength and technique training.
Back Injuries
Compression fractures and disc injuries from hard landings. More common in big-air and park riding. Back protectors offer meaningful protection.
Coccyx Fractures
Extremely painful and slow to heal. Almost entirely preventable with impact shorts. Disproportionately common in beginners.
“Skier’s Thumb”
Ulnar collateral ligament sprain from pole-gripping or wrist guard edge catching. Wrist guards with thumb protection are specifically designed to reduce this risk.
The scaphoid is a small wrist bone that fractures commonly in snowboarding falls but is notoriously difficult to diagnose on standard X-rays. If your wrist hurts in the anatomical snuffbox (the hollow between thumb tendons) after a fall, treat it as a fracture and get an MRI — even if initial X-rays appear normal. Undetected scaphoid fractures can lead to avascular necrosis requiring surgery.
Pre-Season Physical Preparation: Build a Resilient Body
Physical preparation is, by a significant margin, the most impactful injury prevention intervention available to recreational snowboarders. Studies consistently show that inadequate physical preparation is a primary risk factor — and that a structured 6-to-8-week pre-season program dramatically reduces both injury frequency and severity. You wouldn’t run a marathon without training. Don’t hit the mountain without preparing.
Three physical qualities directly drive injury risk: muscular strength (particularly legs, core, and shoulders), balance and proprioception (joint position sense — your body’s ability to detect and correct instability before it becomes a fall), and muscular endurance (the ability to maintain safe technique throughout a full day of riding, not just the first two runs). All three are specifically trainable in the pre-season. Follow a structured pre-season snowboard fitness checklist for the full program.
A meta-analysis published in BMC Sports Science found that multi-component intervention programs reduced overall injury rates in snow sports by 50% (injury rate ratio 0.50, 95% CI 0.41–0.62). This is among the largest effect sizes found in any sports injury prevention research. Physical preparation works.
The Snowboard Injury Prevention Exercise Program
A targeted pre-season training program should address the four neuromuscular risk factors that research identifies as primary drivers of snowboard injury: ligament dominance (relying on joints instead of muscles to absorb force), quadriceps dominance (underutilizing hamstrings during deceleration), leg dominance (significant strength asymmetry between limbs — a 20% difference increases injury risk substantially), and trunk dominance failure (poor lateral core control during dynamic movements).
| Exercise | Target | Sets × Reps | Why It Matters |
|---|---|---|---|
| Single-Leg Squat | Quad, glute, proprioception | 3 × 10 each | Corrects leg dominance; mirrors snowboarding’s single-leg loading |
| Romanian Deadlift (single-leg) | Hamstrings, glutes | 3 × 8 each | Corrects quad dominance; builds posterior chain for deceleration |
| Lateral Band Walks | Glute medius | 3 × 15 each direction | Prevents knee valgus (inward collapse) during landings |
| Copenhagen Plank | Hip adductors, core | 3 × 20 sec each | Reduces ACL risk by strengthening the medial knee stabilizers |
| Pallof Press | Rotational core stability | 3 × 12 each side | Corrects trunk dominance; builds anti-rotation strength |
| Box Jump to Soft Landing | Plyometric control | 3 × 6 | Trains landing mechanics — knees over toes, no inward collapse |
| Balance Board Work | Proprioception, ankle stability | 3 × 60 sec | Rebuilds joint position sense — the primary wrist/ankle injury preventer |
| Push-Up Variations | Shoulder stability, chest | 3 × 15 | Builds the shoulder support that reduces dislocation risk in falls |
| Face Pulls (band) | Rotator cuff, rear delt | 3 × 15 | Balances pressing work; directly reduces shoulder injury risk |
| Wrist Flexion/Extension (dumbbell) | Wrist flexors/extensors | 3 × 15 each | Pre-loads the structures most vulnerable to FOOSH fractures |
| Wall Sit with Perturbation | Quad endurance, stability | 3 × 45 sec | Builds the muscular endurance that prevents late-day fatigue injuries |
| Lateral Hop & Stick | Single-leg landing control | 3 × 8 each | Trains the sudden lateral deceleration patterns of snowboarding falls |
Weeks 1–2: Foundation (bodyweight, low intensity, form focus). Weeks 3–4: Load (add resistance, increase single-leg volume). Weeks 5–6: Power (add plyometrics, speed). Weeks 7–8: Specificity (on-snow or snow-simulation movements, interval training). Interval training specifically — short bursts of high intensity followed by rest — mimics the physiological demands of a run and should be incorporated from Week 5 onward.
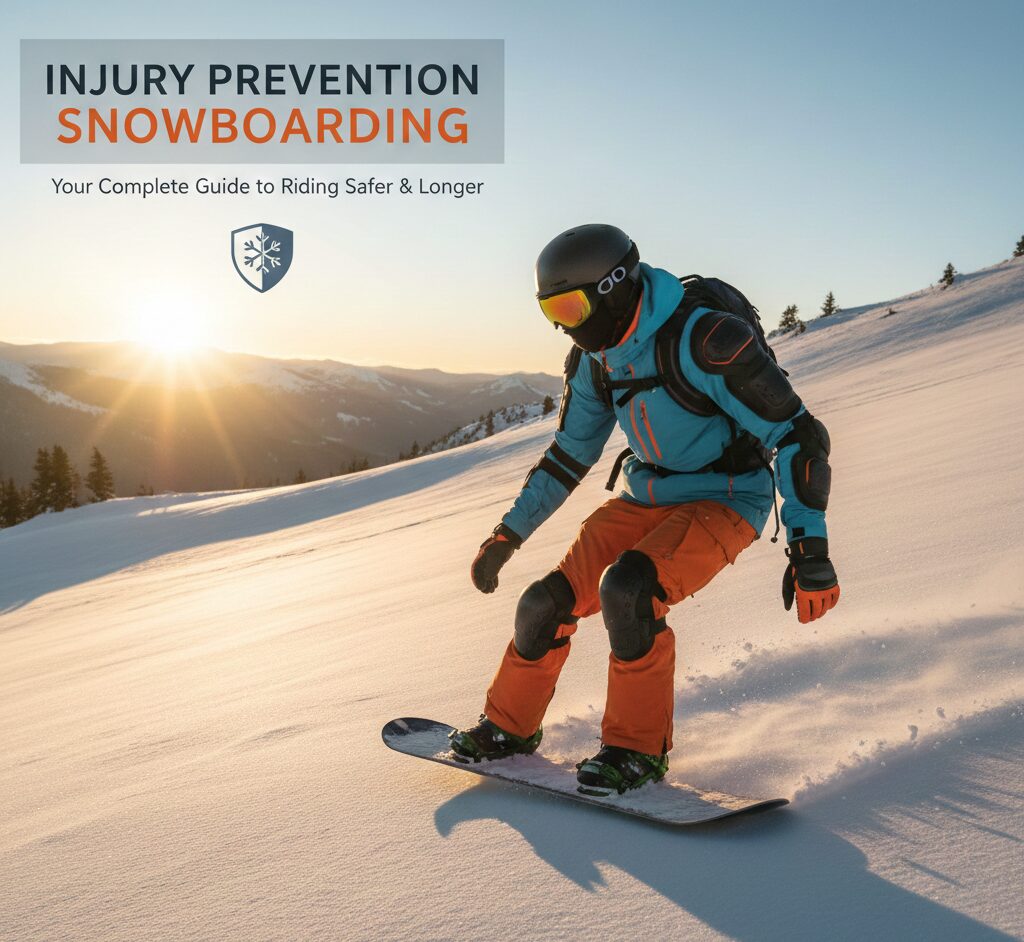
Proper Gear Is Your Primary Protection
Your equipment is your first line of defense — but only when correctly specified for your ability level, body, and riding style. The board, bindings, and boots function as a system. A mismatch in any component increases injury risk disproportionately to what the individual component problem might suggest.
Board choice: Beginner boards feature softer flex, which is more forgiving and less punishing when technique breaks down. A stiff, aggressive camber board on a beginner dramatically increases the likelihood of edge catches and falls. Bindings: Too loose increases ankle rolls and edge-catch risk; too tight restricts blood flow and numbs proprioception. Have your binding baseplate cant and lift angles evaluated by a professional boot fitter if you experience recurring ankle, knee, or hip discomfort. Never ride damaged equipment. Delaminating bases, cracked edges, and compromised binding straps all increase risk in ways that are not proportional to how minor the damage appears.
Boot & Binding Fit: The Most Underrated Safety Factor
Poorly fitted boots are one of the most common — and most entirely preventable — causes of snowboard injury. The boot is your primary interface with the board and the primary structural support for your ankle joint. A boot that is too large allows the foot to move inside the shell, creating friction, reducing proprioception, and dramatically increasing ankle sprain risk on every turn. A boot that is too small creates pressure points that restrict circulation and cause numbness — which is itself a safety hazard.
Helmet Tech & Fit: Non-Negotiable Safety
Always wear a helmet. This requires no qualification. Modern snowboard helmets are lightweight, warm, breathable, and technologically advanced — the common objections (too heavy, too hot, affects peripheral vision) are twenty years out of date. Helmet use has been associated with a significant reduction in skull fractures, severe head injuries, and fatalities in skiers and snowboarders admitted to hospital.
MIPS technology (Multi-directional Impact Protection System) or equivalent rotational force management systems (WaveCel, SPIN, Koroyd) address a gap that traditional EPS-foam helmets miss: angled impacts. The majority of head impacts in snowboarding are not direct frontal hits — they involve a rotational component that transmits shear forces to the brain. MIPS adds a low-friction slip plane between the outer shell and the liner, allowing a 10–15mm independent rotation that absorbs these rotational forces before they reach the skull. For a full technical breakdown, read our guide on best snowboard helmets with MIPS integration.
 🛡️ Shop MIPS Helmets on Amazon
A MIPS helmet that fits poorly offers less protection than a non-MIPS helmet that fits correctly. The helmet must sit level on your head (two finger-widths above your eyebrows), the retention system must be snug with no lateral wobble, and the chin strap must be tight enough that you cannot slip a finger between it and your chin. Replace any helmet after a significant impact — the EPS foam compresses permanently and cannot protect as effectively on a second hit, even when the helmet shows no visible damage.
Wrist Protection Mastery: Stop the #1 Injury
Wrist injuries are the single most common snowboarding injury, accounting for approximately 30% of all cases. The mechanism — FOOSH (Fall On OutStretched Hand) — is powerful and instinctive: as your body detects a fall, your hands automatically extend to brace the impact. The weight of your body and board, multiplied by the velocity of the fall, concentrates enormous force onto the small carpal bones of the wrist.
Wrist guards are the most evidence-supported protective gear in snowboarding after helmets. A landmark study in the American Journal of Sports Medicine demonstrated that wrist guards reduce the risk and severity of wrist injuries in snowboarders across skill levels. They work through two mechanisms: distributing impact force along the forearm rather than concentrating it at the wrist, and preventing the hyperextension and hyperflexion that causes ligamentous damage. For the complete science, read our guide on FOOSH prevention with wrist guards.
Integrated Glove-Guards
Wrist guard built into the glove. Most convenient for all-day wear, stays in place. Best for recreational riders who want seamless protection.
Sleeve Wrist Guards
Worn under gloves. Typically offers superior rigid-splint protection. Preferred by park riders who need maximum wrist protection without sacrificing glove choice.
Soft Guards
No rigid splint — compression and padding only. Offers limited fracture protection but better than nothing for mild impact scenarios. Not recommended for beginners.
Impact Mitts
Gloves with padded palm but no rigid splint. Protect against abrasion and moderate impact. Useful for experienced riders who find rigid guards restrictive.
Impact Shorts, Back Protectors & Body Armor
For park riders, beginners, or anyone prone to tailbone and hip hits, impact protection worn under your snow pants is a genuine game-changer. Modern impact shorts use materials like D3O — a non-Newtonian polymer that flows freely during normal movement but hardens instantly on impact, absorbing and dissipating kinetic energy with extraordinary efficiency. Unlike traditional foam padding, D3O protection is thin, flexible, and barely noticeable during normal riding. Check out the best impact shorts for snowboarding for full technology comparisons.
Back protectors address a different risk profile: spinal compression and vertebral fractures from hard landings, particularly in park and big-air riding. Research has examined whether back protectors prevent spinal injury in recreational snowboarders with mixed conclusions regarding spinal cord protection, but they demonstrably reduce soft tissue bruising and rib injury risk, which is meaningful for anyone riding large terrain. They are available as standalone vests or integrated into many snowboard jackets.
Knee pads add meaningful impact protection for rail riding and any scenario where a knee-first fall is likely. Low-profile skate-style pads sit under pants without bulk and can prevent the painful bone bruises that sideline riders for weeks. This is not about being risk-averse — it is about allowing yourself to push your limits with a meaningful safety net beneath you.
ACL Injury Prevention: The Biomechanics Approach
ACL (anterior cruciate ligament) tears are less common in snowboarding than in skiing, but they are career-defining injuries that require 9–12 months of rehabilitation and carry a significant re-injury risk. Understanding the biomechanical mechanisms that cause ACL tears — and training specifically to counteract them — is among the highest-value injury prevention work a snowboarder can do.
Research identifies four neuromuscular risk factors for ACL injury in snow sports. Ligament dominance occurs when the rider relies on the knee ligament and joint structure to absorb forces instead of muscular control — corrected by training for proper deceleration technique. Quadriceps dominance is a pattern where the knee remains more extended because the athlete over-activates their quadriceps and underutilizes their hamstrings — corrected by incorporating hamstring strengthening (Romanian deadlifts, Nordic curls). Leg dominance refers to significant strength asymmetry between limbs; a 20% strength decrease in one limb dramatically increases injury risk — corrected by single-leg training. Trunk dominance causes the trunk to tilt laterally during dynamic movements — corrected with core stabilization training, particularly lateral and anti-rotation movements.
The Landing Mechanics Protocol
The primary ACL prevention drill for snowboarders: Practice landing from jumps with both feet simultaneously, knees bent to approximately 90°, over your toes, with your hips back as if sitting into a chair. Never land with straight legs. Straight-legged landings transmit the entire impact force directly through the knee joint rather than dissipating it through muscular work. If you catch yourself landing stiff-legged after a jump, reduce the jump size and rebuild the landing pattern before progressing.
Shoulder Injury Prevention: Protecting Your Most Vulnerable Joint
The shoulder is the second most commonly injured body part in snowboarding, with dislocations, acromioclavicular (AC) joint sprains, and rotator cuff tears all occurring with regularity. The mechanism is usually direct impact — falling onto an outstretched arm at shoulder level, or landing directly on the shoulder point — although some rotator cuff injuries develop progressively from the repetitive demand of catching yourself during many small falls.
Prevention has three components. First, strength training: the shoulder joint is inherently unstable (it trades stability for mobility) and relies heavily on the rotator cuff musculature for dynamic stabilization. Face pulls, external rotations with a band, and rear delt work directly strengthen the posterior rotator cuff that is most commonly torn. Second, falling technique: learning to distribute forward-fall impact across the forearm rather than the shoulder point dramatically reduces shoulder injury risk. Third, progressive progression: shoulder dislocations often happen when a rider attempts a trick or terrain beyond their current skill level and falls awkwardly at speed — smart terrain progression is direct shoulder injury prevention.
If you experience a shoulder dislocation on the mountain, do not attempt to relocate it yourself and do not allow non-medical personnel to relocate it. Immobilize the arm, descend to ski patrol, and receive proper medical relocation and imaging. A first dislocation significantly weakens the capsular tissue and dramatically increases re-dislocation risk — physical therapy targeting shoulder stability is essential before returning to riding.
Concussion Protocol & Return-to-Ride Guidelines
Concussions represent one of the most mismanaged injuries in recreational snow sports. The instinct to “shake it off and keep riding” is deeply embedded in snowboard culture — and it is potentially life-threatening. A second concussion sustained before the brain has fully recovered from the first (Second Impact Syndrome) can cause catastrophic, irreversible brain swelling. Any suspected concussion requires immediate cessation of riding for that day, regardless of symptom severity.
Recognizing a concussion requires understanding that loss of consciousness occurs in only a minority of cases. The more common presentation includes: headache, pressure in the head, feeling slowed down or “in a fog,” difficulty concentrating, nausea, balance problems, sensitivity to light or noise, and emotional changes. Any of these symptoms following a head impact should be treated as a concussion.
| Stage | Activity | Criteria to Progress |
|---|---|---|
| 1 — Rest | Complete cognitive and physical rest | Symptom-free at rest for 24 hours |
| 2 — Light Activity | Walking, light stretching | No symptom return during activity |
| 3 — Moderate Exercise | Running, gym work — no impact risk | No symptoms during moderate exertion |
| 4 — Snow-Specific Exercise | On-snow riding — no jumps, easy terrain | Medical clearance obtained |
| 5 — Full Return | All terrain and features | Asymptomatic through Stage 4 with medical sign-off |
Call emergency services immediately if the injured person: loses consciousness for more than a few seconds, has a seizure, vomits repeatedly, has unequal pupils, cannot recognize people or places, has weakness or numbness in limbs, or has a worsening headache that doesn’t respond to rest. These may indicate a more severe brain injury requiring immediate intervention.
Dynamic Warm-Up Routine: Prime Your Body to Ride
Cold muscles are injury magnets. At low temperatures, muscle viscosity increases, reducing the speed and range of muscle fiber recruitment — which means that your first run is biomechanically similar to asking a cold engine to run at full load. Blood flow to peripheral muscles is reduced. Nerve conduction velocity decreases. Joint fluid (synovial fluid) takes time to fully lubricate joint surfaces. A structured dynamic warm-up addresses all of these factors before you put them under load.
The 10-minute on-mountain protocol:
How to Fall Safely: The Art of the Bail
Falling is an integral part of snowboarding — even elite professionals fall regularly. The difference between a bruise and a broken bone is often the quality of the fall technique. This is a genuine skill that requires deliberate practice to override the instinctive response of reaching out with straight arms.
The Golden Rule of Falling: Go Limp, Not Rigid
Tense muscles and locked joints transmit more force to bones. When you feel a fall beginning, your goal is to relax and flow with the momentum rather than fight it. Tuck your chin to your chest. Bring your arms close to your body. Roll rather than slide whenever possible — rolling distributes impact force across a larger surface area and time period. This is counterintuitive under adrenaline but dramatically reduces injury severity.
Falling forward: Resist the FOOSH instinct. Bend your elbows and lead with your forearms, not your hands. Aim to land on the padded forearm area, not the wrist. If wearing wrist guards, they can take the load — but the forearm distribution is still the goal. Allow the landing to roll you forward rather than stopping abruptly.
Falling backward: Tuck your chin aggressively to your chest to prevent the back of your head hitting the snow. Round your back. Aim to land on the full length of your back and buttocks rather than concentrating impact on the tailbone. Keep your arms close to your body — reaching out backward is the primary cause of shoulder dislocations and wrist fractures in rear falls.
Practice this: On a carpeted surface or gym mat at home, practice falling forward (to forearms) and backward (tuck chin, round back) repeatedly until the movement feels automatic. Muscle memory built off-snow is available to you on-snow when the panic reflex fires — building the reflex off-snow is far more reliable than trying to remember technique while actually falling at speed.
Snow Conditions & Weather: Reading the Mountain’s Risk Profile
Snow conditions have an enormous impact on injury risk — yet many riders apply the same riding style regardless of what the mountain is giving them. Developing the ability to read conditions and adjust your technique and risk tolerance accordingly is one of the most sophisticated and impactful injury prevention skills you can develop.
| Condition | Risk Profile | Prevention Strategy |
|---|---|---|
| Hardpack / Ice | High — edges can catch abruptly; falls are fast and hard | Sharpen edges before icy conditions; reduce speed; avoid park features on very icy days |
| Heavy Wet Snow | Medium — board can stop suddenly causing forward pitch | Widen stance slightly; increase forward lean; be prepared for sudden deceleration |
| Afternoon Slush | Medium — inconsistent resistance; board can sink and catch | Ride with more weight on rear foot; avoid aggressive toe-edge carves in deep slush |
| Wind Crust | High — can hold weight, then suddenly break, catching edges | Test before committing to speed; suspect terrain; stay alert to surface changes |
| Variable / Tracked-Out | Medium-High — unpredictable transitions between snow types | Ride defensively; reduce speed through uncertain sections; trust your edge instincts |
| Powder | Low impact force — soft landings; risk of tree wells, burial | Never ride powder alone; stay within resort boundaries unless properly equipped |
| Limited Visibility (flat light, fog) | High — terrain reading impossible; bumps and drops invisible | Significantly reduce speed; use high-contrast lens goggles; consider stopping for the day |
“The mountain doesn’t care about your skill level. It only cares about what you do with the conditions it gives you.”
— Core principle of adaptive mountain ridingAltitude Effects: The Invisible Performance Impairment
Most ski resorts operate at altitudes between 6,000 and 12,000 feet (1,800–3,600m) above sea level. At these elevations, several physiological changes occur that directly increase injury risk — most of which riders are entirely unaware of until they understand the mechanisms.
Reduced oxygen availability at altitude means your muscles fatigue more quickly at the same perceived effort level. This accelerates the fatigue-related injury risk that peaks in the afternoon — but it begins operating from your very first run if you’ve recently arrived from lower elevation. Accelerated dehydration occurs at altitude because dry mountain air causes significant respiratory water loss — you lose water simply by breathing, at a rate significantly higher than at sea level. Dehydration impairs neuromuscular coordination, reaction time, and decision-making — all critical safety factors. Acute Mountain Sickness (AMS) affects a significant proportion of riders who ascend quickly to high-altitude resorts. Symptoms including headache, nausea, dizziness, and impaired concentration are often mistakenly attributed to other causes. AMS significantly impairs the judgment and physical coordination needed for safe riding.
If arriving from sea level or low elevation: Rest on arrival day — don’t ride the same day you arrive. Drink 3–4 liters of water on your first day. Avoid alcohol for the first 48 hours (alcohol dramatically worsens altitude dehydration and AMS). Begin with easy terrain on Day 1 regardless of your skill level. Most riders fully acclimatize within 2–3 days. If AMS symptoms are severe or worsening after 24 hours, descend to lower elevation.
Avalanche Awareness & Backcountry Safety
As backcountry and side-country riding continues to grow in popularity, avalanche awareness has become essential knowledge for any snowboarder venturing beyond resort boundaries. Approximately 150 people die in avalanche-related incidents in North America each year, and snowboarders accessing uncontrolled terrain represent a growing proportion of that number.
This guide cannot substitute for formal avalanche safety training — but it can establish the absolute minimum knowledge every rider needs before accessing uncontrolled terrain. The core principle is simple: never venture into avalanche terrain without a beacon, probe, and shovel — and the training to use all three. Carrying the equipment without the training is not meaningfully safer than carrying nothing.
Hydration & Nutrition: Fuel for Focus & Safety
Dehydration and hypoglycemia (low blood sugar) are performance and safety impairments that operate invisibly until they’ve already degraded your coordination and judgment. At altitude, you lose approximately 1–1.5 liters of water per hour through respiration alone — before you account for sweat. Thirst is a lagging indicator at altitude; by the time you feel thirsty, you are already meaningfully dehydrated.
A practical hydration protocol: begin the day with 500ml of water before leaving the lodge; carry a water bottle (insulated to prevent freezing at altitude) and drink 200–300ml every 45 minutes regardless of perceived thirst; rehydrate with water and electrolytes (not just plain water) at lunch. Sodium, potassium, and magnesium are lost significantly at altitude and through sweat — an electrolyte drink at lunch replaces these micronutrients and supports continued neuromuscular function.
Nutrition timing matters. A balanced, protein-and-complex-carbohydrate breakfast before riding establishes a steady blood glucose baseline. Carry high-energy portable snacks (nuts, energy bars, fruit) to eat every 2 hours on the mountain. Skipping lunch is a common mistake that significantly increases afternoon fatigue — and with fatigue, injury risk. Avoid alcohol at lunch — it impairs balance and judgment for 3–4 hours afterward, long enough to affect your last few runs of the day when injury rates are already highest.
Fatigue & Awareness: The Silent Danger
The data is unambiguous: the majority of snowboarding injuries occur in the afternoon, when riders are physically fatigued and cognitively impaired by hours of concentrated physical effort. Studies show that injury rates increase when skiing or riding for more than 3 hours without a meaningful break. Fatigue reduces muscle strength and coordination, impairs reaction time, and — critically — impairs the judgment that tells you when something is beyond your current ability level.
Fatigue also changes risk perception. A fatigued rider consistently underestimates the difficulty and consequence of terrain they are approaching, while simultaneously overestimating their own current physical capacity. The last run of the day is statistically the most dangerous. “One more run” is the precursor to a disproportionate number of significant injuries. Develop the discipline to stop before the fatigue becomes obvious in your riding — sloppy turns, frequent edge catches, and imprecise landings are your body’s warning signals. Honor them.
Take a genuine break (15–20 minutes off the mountain, sitting down, eating and hydrating) after every 2.5–3 hours of riding. Research shows this break pattern reduces injury rates significantly compared to continuous riding. It feels like lost riding time but it extends your safe riding life both within the day and across the season.
Collision Avoidance & the Skier’s Responsibility Code
Collisions with other riders account for approximately 8% of snowboard injuries — and a disproportionate share of the most severe ones, since collisions concentrate the kinetic energy of two moving bodies rather than one. The Skier’s Responsibility Code (FIS Rules) establishes the legal and ethical framework for right-of-way on the mountain. Understanding and following these rules is not optional — it is a safety obligation.
Uphill Rider Is Responsible
The rider behind and above always has the primary responsibility to avoid the rider below. If you collide with someone below you, the burden of proof is on you.
Ride in Control
Always ride at a speed and in a manner that allows you to stop or avoid any obstacle or person. “Control” means controlled relative to your current terrain, conditions, and visibility.
Don’t Stop in Blind Spots
Never stop in a narrow section of trail, below a crest, or anywhere you cannot be seen by approaching riders above you. Move to the edge of the run.
Yield When Entering
When merging onto a run or starting from a standstill, look uphill and yield to all approaching traffic. This is identical to entering a road from a driveway.
Smart Terrain Progression: Ego Is the Enemy
Riding terrain or attempting tricks beyond your current skill level is one of the primary controllable injury risk factors in snowboarding. Research consistently shows that the injury profile shifts based on skill level — beginners sustain more wrist and ankle injuries from basic falls, while intermediate and advanced riders sustain more severe injuries from attempting overly challenging terrain and features. At every stage, there is a sweet spot between progression and overreach.
Professional instruction is one of the most effective injury prevention investments available. A certified instructor does not just teach you to ride — they teach you to fall, to read terrain, to manage speed, and to progress through features safely. Even experienced riders benefit enormously from professional coaching, which can identify technique flaws that have been increasing injury risk for years without the rider being aware. Use the snowboard trick progression ladder to build park skills in the correct sequence.
Before any new feature or terrain, ask three questions: 1) What’s the worst realistic outcome if this goes wrong? 2) Am I prepared physically and technically for that outcome? 3) Is today the right day — am I rested, warmed up, and mentally sharp? If the answer to any of these questions is no, the feature or terrain waits for another day. This is not fear — it is strategic patience, and it is how riders have long careers.
Youth & Pediatric Rider Safety: Different Risk, Different Approach
Pediatric snowboarders have a distinct injury profile that requires age-specific prevention strategies. Despite comprising only 12% of participants, youth riders account for 23% of all snowboard injuries. Several physiological factors explain this disproportion: a higher center of gravity relative to body height, an increased head-to-body ratio (increasing head injury risk), less developed neurocognitive control and proprioception, and a tendency toward poorer judgment about risk and speed management.
Head trauma represents 19% of pediatric snowboard injuries — the single most common injury type in this age group, compared to wrist injuries in adults. This makes helmet use even more critical for young riders. Additionally, growth plate injuries (Salter-Harris fractures) in children are a unique concern: the growth plate at the end of long bones is weaker than adjacent ligaments, meaning forces that would cause a sprain in an adult can cause a fracture at the growth plate in a child. Any significant impact to a growing child’s joints should be evaluated medically — do not assume it is “just a sprain.”
Parent’s Youth Safety Checklist
Certified ASTM helmet — fitted by a professional. Wrist guards on every session — non-negotiable for beginners. Age-appropriate lessons from a certified instructor before terrain park access. Clear terrain boundaries established before each session. Regular rest breaks every 60–90 minutes (children fatigue faster than adults). No park access until basic mountain skills are fully established. Reinforce falling technique at home on carpet before the first session.
Return to Sport After Injury: The Graded Rehab Progression
Returning to snowboarding after injury is one of the highest-risk periods for re-injury. The physical injury has healed — or appears to have healed — but the protective neuromuscular adaptations (proprioception, reactive muscle activation, movement patterns) that were disrupted by the injury have not yet fully recovered. Riders who return at full intensity before these systems are restored sustain re-injuries at a dramatically elevated rate.
Psychological readiness is an equally important but frequently overlooked component of return to sport. Fear of re-injury — whether conscious or subconscious — alters movement patterns in ways that can paradoxically increase injury risk. Protective guarding of a previously injured limb changes loading patterns across the entire kinetic chain. A rider who is physically cleared but psychologically not ready will ride differently — and often less safely — than before their injury. Work with a sports physiotherapist rather than attempting independent return-to-sport progression for any significant injury.
| Injury Type | Typical Return Timeline | Key Milestones Before Full Return |
|---|---|---|
| Wrist Fracture | 6–12 weeks | Pain-free range of motion; grip strength 90% of opposite side; wrist guard worn on return |
| Shoulder Dislocation | 3–6 months | Full pain-free ROM; rotator cuff strength symmetry; physical therapy clearance |
| Concussion | 1 week–3+ months | Symptom-free at rest and exertion; graduated return protocol completed; medical clearance |
| ACL Reconstruction | 9–12+ months | Quad/hamstring strength ratio; single-leg hop tests; psychological readiness assessment |
| Coccyx Fracture | 4–8 weeks | Symptom-free sitting and standing; impact shorts worn throughout return season |
| Ankle Sprain (Grade 2) | 3–6 weeks | Full pain-free ROM; single-leg balance test; boot support assessment |
Post-Ride Recovery: Repair & Reset for Tomorrow
Recovery is proactive injury prevention. What you do in the hours after riding directly determines how your body performs — and how safely — on the following day. Multi-day snowboard trips compound fatigue unless recovery is actively managed each evening. Riders who neglect post-ride recovery accumulate a physiological debt that pays out as injury risk by day three or four of a trip.
Immediate post-ride (first 30 minutes): Eat a recovery snack with a 3:1 carbohydrate-to-protein ratio within 30 minutes of finishing riding. This window is when muscle glycogen restoration is fastest. Rehydrate with water plus electrolytes. Remove damp boot liners and allow them to dry completely — this also prevents fungal issues and maintains the integrity of the liner material that provides your ankle support.
Evening routine: Static stretching (as opposed to the dynamic stretching used in warm-ups) is appropriate in the evening when muscles are warm. Focus on: hip flexors (kneeling lunge stretch), quads (standing quad pull), hamstrings (seated forward fold), thoracic spine (foam roller), and calves (wall stretch). Hold each position for 30–60 seconds. Ice any acutely sore joints for 15–20 minutes. Elevate legs if your lower limbs feel heavy. Minimize alcohol — it disrupts sleep architecture and significantly impairs the muscle repair and hormonal restoration that happen during deep sleep.
Sleep: Sleep is when the vast majority of physical repair occurs. Human growth hormone — the primary driver of tissue repair — is released almost entirely during deep sleep. Targeting 8–9 hours of sleep during a multi-day snowboard trip is not indulgence; it is a measurable injury prevention strategy. Riders who sleep less than 7 hours consistently show impaired reaction time and judgment that increases injury risk the following day.
Injury prevention isn’t about avoiding snowboarding’s inherent thrill — it’s about stacking the odds in your favor so you can keep riding for years and decades to come. Every strategy in this guide is a layer of protection. No single layer is perfect, but the combination of physical preparation, correct gear, smart decision-making, and post-ride recovery creates a comprehensive defense that genuinely works. The riders who ride longest are not the most cautious — they are the most prepared. Stay safe, ride smart, and see you on the mountain.
Injury Prevention Snowboarding: Your Questions Answered
Wrist fractures and sprains, accounting for up to 30% of all snowboard injuries. Prevent them by wearing quality wrist guards consistently, training the falling reflex (tuck and roll, forearm lead rather than outstretched hands), and strengthening the wrist and forearm musculature in the pre-season with wrist flexion/extension exercises.
Yes — multiple studies including a landmark paper in the American Journal of Sports Medicine show that wrist guards significantly reduce the risk and severity of wrist injuries in snowboarders. They work by distributing impact force along the forearm and preventing the hyperextension that causes fractures. They are especially crucial for beginners but recommended for all park riders.
If you took a significant impact, replace it immediately — even if the helmet looks undamaged externally. The EPS foam liner compresses permanently to absorb energy, and this compression is largely invisible. A post-impact helmet will not protect as effectively on a second hit. Most manufacturers offer a crash replacement program at a reduced cost.
Concussion does not require loss of consciousness. Watch for: headache or pressure in the head, feeling foggy or slowed down, difficulty concentrating, nausea or vomiting, balance problems, sensitivity to light or noise, and unusual emotional changes. Any of these following a head impact mean riding stops for that day. The rule is simple: if in doubt, sit out.
A 10-minute dynamic warm-up: leg swings (forward/backward and lateral), torso rotations, arm circles, bodyweight squats, and lunges with rotation. Follow with wrist circles and wrist flexion/extension. Then ride 2–3 easy groomer runs before attempting any challenging terrain or features. Never skip the easy warm-up runs — your proprioceptive system needs real snow to calibrate.
Train the four neuromuscular risk factors: correct ligament dominance with landing mechanics training, correct quad dominance with hamstring strengthening, address leg dominance with single-leg exercises, and improve core stability. On-snow: always land jumps with bent knees absorbing impact, never straight-legged; ensure binding stance is appropriate for your anatomy; and ride within your skill level to avoid the awkward falls that cause ACL injuries.
Somewhat, yes. Snowboarding’s linked-feet stance is somewhat protective against certain ACL injury mechanisms common in skiing (the “phantom foot phenomenon” and edge-catch ACL mechanism). However, snowboarding carries its own knee injury risks, particularly in jump landings and when the board catches an edge at speed. Overall injury rates are comparable between the two sports; the injury profiles differ.
1) Stay still for a moment — assess yourself for pain, numbness, or inability to move before getting up. 2) Move to the side of the run to avoid incoming traffic. 3) Check systematically: head, neck (move carefully), shoulders, wrists, hips, knees. 4) If something feels seriously wrong — numbness, severe pain, inability to bear weight — signal for ski patrol. Do not try to ride down with a significant injury. 5) For any head impact, stop riding for the day regardless of how you feel.
Absolutely. Modern impact shorts with D3O or similar non-Newtonian polymer padding protect your tailbone (coccyx) and hips from bruises and fractures that are extremely common in beginners and park riders. A tailbone fracture sidelines a rider for 4–8 weeks. Impact shorts cost £40–£80 and are worn under regular snow pants — imperceptible during riding but highly effective during falls.
Fatigue reduces muscle strength, coordination, and reaction time simultaneously while impairing the judgment that assesses risk. Most snowboard injuries occur in the afternoon. The compounding effect of reduced physical capacity plus impaired decision-making plus the increased risk-taking that fatigue facilitates creates a disproportionate afternoon injury spike. The 3-hour rule — a genuine break after every 2.5–3 hours of riding — directly counteracts this.
Unequivocally yes. Professional instruction is one of the highest-value injury prevention investments available. Certified instructors teach proper technique from the start — including how to fall, how to manage speed, and how to progress through terrain safely. A video-based training program studied in American Journal of Sports Medicine reduced serious knee sprains in on-slope staff by 62%. Even experienced riders benefit from coaching that identifies and corrects injury-promoting technique flaws.


