Can You Repaint a Snowboard? The Complete DIY Custom Graphics Guide
Yes — you absolutely can repaint a snowboard, and with the right approach it can look stunning while lasting multiple seasons on the hill. Whether your favorite deck has faded graphics, a battle-scarred topsheet from years of park riding, or you simply want something more personal than the factory print, a custom repaint is one of the most rewarding projects a snowboarder can take on. This guide covers every method from quick spray-can makeovers to full epoxy pour art, including all the prep work, materials science, and finishing secrets that separate a clean, lasting job from one that peels off on your first run.

1. Can You Really Repaint a Snowboard?
The short answer is yes — but the full picture is more nuanced than cracking open a can of spray paint and going to town. Snowboards are composite structures with several distinct layers, and understanding what you’re painting on, and what physical forces that paint must survive, is the difference between a project that lasts multiple seasons and one that starts peeling on your first lap down the mountain.
Snowboards flex — a lot. The topsheet of a modern snowboard is typically a layer of either fiberglass-reinforced laminate, ABS plastic, or a wood veneer, and it bends through its full range of motion every time you load an edge, stomp a landing, or butter a roller. Whatever you apply to that surface needs to flex with the board rather than fight against it. Rigid paints — standard house paint, traditional enamel, or oil-based craft paint — will microcrack and eventually flake off because they cannot keep up with the repeated mechanical stress the topsheet experiences throughout a season.
But that doesn’t mean painting is difficult or out of reach. Flexible acrylic paints, urethane-based automotive paints, epoxy resin art formulas designed for flexibility, and purpose-made vinyl wraps all handle snowboard flex beautifully when applied correctly over a properly prepared surface. Thousands of snowboarders have done full custom repaints in their garage with impressive, professional-looking results — and you can too.
What Repainting Does and Doesn’t Affect
You are painting the topsheet only — the decorative surface visible when the board is sitting graphic-side-up on the floor. The topsheet is a purely cosmetic layer. It has no structural role in the board’s performance characteristics. Your edges are metal and live on the sides and base. Your base is sintered or extruded P-Tex polyethylene on the underside. Your core — the heart of the board that determines its flex pattern, weight, and pop — is fully enclosed inside the laminate stack and never sees your paint.
Repainting your board correctly will have absolutely zero impact on how it rides. Your flex pattern stays the same. Your edge hold stays the same. Your base glide stays completely unaffected because you’re not touching the base. Understanding how your base works helps clarify why a topsheet repaint is truly cosmetic. The only scenario where painting affects ride quality is if you apply an impractically thick coating to the topsheet that changes localized stiffness, and even that would be a marginal effect noticeable only to a trained tester.
When Is Repainting Worth It?
Custom Expression
You want something no one else on the mountain has. A repaint lets you put your exact vision on the deck — truly one of a kind.
Rescued Vintage Boards
Faded or damaged graphics on a structurally sound old board. Repainting restores pride without buying new equipment.
Budget Refresh
A quality used board with ugly graphics becomes a custom showpiece for under $100 in materials and a weekend of work.
Custom Gift
A personally painted snowboard is one of the most memorable gifts in the sport — unique, meaningful, and deeply personal.
A Brief History of Custom Snowboard Graphics
Snowboard graphics have been a defining part of the sport’s identity since the mid-1980s, when brands like Burton, Sims, and Santa Cruz Skateboards realized that bold, irreverent graphics were as much a part of the product as the ride itself. The sport was born from skateboarding and surfing culture — communities that had always understood your board is an extension of your identity. Early snowboard graphics were often hand-screened or sublimation-printed on ABS topsheets, with the same psychedelic and punk aesthetic that ran through the skateboard world of the era.
By the 1990s, pro-model boards with artist-designed graphics became a major marketing vehicle. Riders like Terje Hakonsen, Craig Kelly, and Todd Richards had signature boards whose graphics were as culturally recognizable as their riding. The 2000s brought digital printing to snowboard manufacturing, enabling photorealistic graphics at production scale. But alongside all of that commercial production, a counter-tradition of DIY custom boards has always existed — and today it’s richer and more technically sophisticated than ever, with a huge community of custom board artists sharing techniques across online platforms.

Montana Cans Street Art Spray Paint (12-Pack)
Professional-grade flexible spray paint trusted by custom board artists worldwide. Excellent adhesion on prepared surfaces with a controllable valve system.
Check Price on Amazon →2. Understanding Snowboard Topsheet Anatomy
To paint a snowboard intelligently, you need to understand what you’re working with at a materials level. A modern snowboard topsheet isn’t just a single layer of plastic slapped over the core — it’s a specific part of the board’s laminate construction, and different boards use different topsheet materials that have different properties when it comes to paint adhesion.
The Standard Laminate Construction
Most modern snowboards use a sandwich construction: a wood or foam core is surrounded on top and bottom by fiberglass laminate, the base material is applied to the underside, and the topsheet is bonded to the top fiberglass layer. From topmost surface downward, you’re looking at: topsheet, graphic sublayer (in some boards), fiberglass, core, fiberglass, base. The topsheet’s job is to protect the fiberglass from abrasion, moisture infiltration, and UV degradation. It’s purely functional and decorative — nothing structural is happening at the topsheet layer.
Topsheet Materials by Type
| Topsheet Material | Common Brands | Surface Feel | Paint Adhesion | Special Notes |
|---|---|---|---|---|
| ABS Plastic | Burton, K2, Lib Tech | Smooth, slight flex | Good after scuff sanding | Most common; responds well to flexible acrylics |
| Fiberglass Laminate | Jones, GNU, Capita | Slightly textured, rigid feel | Excellent after light sand | Porous enough to grip primer well |
| Wood Veneer | Arbor, Korua, some Burton | Warm, organic texture | Excellent; wood accepts stain/paint naturally | May need wood-specific sealer before paint |
| Paulownia / Bamboo | Lib Tech, Arbor eco lines | Natural, slightly porous | Excellent; behaves like wood veneer | Avoid water-based primer soaking grain |
The Base: What You Must Never Touch
A critical warning about the base. The base of your snowboard is made of either sintered or extruded polyethylene — a material engineered specifically to glide on snow through its low friction coefficient, its ability to absorb and hold wax, and its resistance to abrasion from ice crystals. Painting, priming, or applying any foreign material to the base will compromise all of those properties. The base is off-limits. Similarly, avoid getting paint near your metal edges — they need to be sharp and free of any coating to do their job. Masking your edges carefully before any spray application is non-negotiable.

DEWALT 5-Inch Random Orbital Sander (DWE6423K)
Variable speed random orbital sander — ideal for even topsheet prep without gouging or creating low spots. A must-have for serious repaint projects.
Check Price on Amazon →3. Tools & Materials You Need
The core toolkit for a snowboard repaint is modest and accessible. You don’t need a professional spray booth or expensive equipment to get excellent results — though having the right materials matters significantly. Here’s a complete breakdown of everything you’ll need depending on your chosen method.
Universal Preparation Tools (All Methods)
Sandpaper in Multiple Grits
You’ll need 180-grit for aggressive graphic removal, 220-grit for standard surface prep, and 400-grit for final smoothing before prime. Wet-dry sandpaper works best and can be used dry for topsheet prep.
Random Orbital Sander (Recommended)
A 5-inch random orbital sander with a 220-grit disc dramatically speeds up surface prep on the long flat sections of the topsheet. It distributes sanding pressure more evenly than hand sanding alone, reducing the risk of creating low spots in the surface.
Isopropyl Alcohol (90%+)
Used for final surface cleaning after sanding to remove dust, oils from your hands, and any residue before paint or primer goes on. Critical step — fingerprints contain natural oils that prevent paint adhesion.
High-Quality Painter’s Tape
3M ScotchBlue or FrogTape to mask your edges, binding area, and any area you want to keep paint-free. Don’t use cheap masking tape — it can leave adhesive residue or allow paint to bleed under the edge.
Tack Cloth or Microfiber Wipes
Removes the last traces of sanding dust before paint application. Tack cloths are resin-impregnated and available at any hardware store. One or two is enough for an entire board.
Flexible Primer
A plastic-adhesion primer or flexible spray primer creates the bond between your prepared topsheet and your paint. Rust-Oleum Plastic Primer, SEM Plastic Primer, or 3M General Purpose Adhesion Promoter all work well. Never skip the primer — it is the foundation of the entire project.
Materials by Method
| Method | Paint / Medium | Application Tool | Approx. Cost | Difficulty | Best For |
|---|---|---|---|---|---|
| Spray Paint | Montana Cans, Rust-Oleum Flex, Automotive urethane | Spray can or HVLP gun | $30–$80 | Easy–Medium | Solid colors, gradients, stencil art |
| Acrylic Brush Paint | Flexible acrylic (Golden, Liquitex, FolkArt) | Artist brushes, foam rollers | $20–$60 | Medium | Hand-painted artwork, detailed designs |
| Epoxy Resin Art | Semi-flexible epoxy + pigment paste/powder | Cups, torches, palette knives | $60–$150 | Medium–Hard | Pour art, lace effects, ocean/marble looks |
| Hydro-Dipping | Hydrographic film + activator + base coat | Dip tank, spray gun | $50–$120 | Hard | Complex pattern wraps, camo, carbon fiber looks |
| Vinyl Wrap | 3M 1080 / Avery Supreme vinyl film | Squeegee, heat gun | $40–$100 | Medium | Reversible color change, printed design wraps |
| Airbrush | Flexible airbrush paint (Createx, Wicked) | Airbrush + compressor | $80–$300+ | Hard | Photorealistic artwork, portraits, detailed gradients |
Clear Coat Options Compared
Whatever paint method you choose, the clear coat is the final defensive layer that determines durability. This is the coat that takes the actual abuse — boot edges, binding hardware, rail slides. Don’t compromise here.
| Clear Coat Type | Flexibility | Durability | Best Products | Rating |
|---|---|---|---|---|
| 2K Polyurethane Clear | Medium-High | ★★★★★ | SprayMax 2K, USC Spray Max 2K | Best Overall |
| Flexible Acrylic Lacquer | High | ★★★★☆ | Montana Varnish, Rust-Oleum Crystal Clear | Good DIY |
| Epoxy Clear Topcoat | Medium (semi-flexible) | ★★★★★ | ArtResin, Total Boat Thickset | Best for Resin Art |
| Standard Automotive Clear | Low | ★★★☆☆ | Most hardware store brands | Avoid on Flex Zones |
| Mod Podge / Decoupage | Medium | ★★☆☆☆ | Standard Mod Podge | Not Recommended |
Flexibility Ratings of Common Paint Systems
Flex Tolerance (Higher = More Suitable for Active Boards)
4. Surface Preparation: The Most Important Step
If you walk away from this entire guide with only one lesson, let it be this: surface preparation is the single most important factor in how long your repaint lasts and how good it looks. Professional painters, automotive body technicians, and marine coatings experts all agree that surface prep accounts for roughly 80% of a paint job’s success or failure. The best paint in the world will peel off a poorly prepared surface in days. Mediocre paint applied to a meticulously prepared surface will hold for years.
The reason preparation matters so fundamentally comes down to surface energy and mechanical adhesion. Paint doesn’t just sit on a surface — it needs to bond to it. That bond happens through two mechanisms: chemical bonding (the paint’s chemistry reacting with the substrate’s chemistry) and mechanical adhesion (the paint physically anchoring itself into microscopic pores and scratches in the surface). Factory topsheets are smooth and often covered in release-agent residue from the manufacturing process, which kills both types of adhesion. Your prep work removes that barrier and creates the conditions where paint can actually grip.
Step-by-Step Topsheet Preparation
Remove Bindings and Hardware
Take off your bindings completely. This gives you unobstructed access to the full topsheet and prevents paint from clogging your binding insert threads or getting onto binding parts that should stay clean. Store all screws in a labeled container.
Initial Clean of the Topsheet
Wipe the entire topsheet down with a clean cloth dampened with isopropyl alcohol (90%+) or naphtha. This removes wax transfer, sunscreen residue, lift line grease, and hand oils accumulated over seasons of riding. Let it dry completely — 15 minutes minimum.
First Sand: Remove Graphics (180-grit)
Using 180-grit sandpaper on a sanding block, or a random orbital sander, begin sanding the topsheet in long, even passes along the board’s length. Your goal is to remove the factory clear coat and any graphic elements. Work evenly — don’t concentrate on one spot and skip others. The surface should look uniformly dull with no shiny spots remaining when you’re done with this phase.
Second Sand: Create Bite (220-grit)
Switch to 220-grit and go over the entire surface again. This refines the scratch pattern from the 180-grit and creates an ideal surface profile for primer to grip. Your topsheet should feel uniformly matte-rough at this point — almost like fine-grit sandpaper itself.
Blow Off Dust and Tack Cloth
Blow the surface clean with compressed air to remove all sanding dust. Then wipe down the entire topsheet with a tack cloth to capture the last traces of fine dust. Do not touch the surface with bare skin after this step — oils in fingerprints are enough to create adhesion failures.
Final IPA Wipe
One more wipe with isopropyl alcohol on a lint-free cloth. The surface should look almost clean again — just uniformly dull from the sanding. Let it flash off completely (5 minutes) before applying primer.
Mask Edges and Inserts
Apply painter’s tape carefully along all four edges of the board, creating a clean border between the topsheet and the sidewall/edge area. Plug your binding inserts with tape or small pieces of foam to prevent primer and paint from entering the threads.
Apply Flexible Primer
In a well-ventilated area, apply 2–3 light coats of flexible plastic primer over the entire topsheet, following the can’s recommended flash times between coats (usually 5–10 minutes). Thin coats are always better than thick ones. Let the primer cure fully — ideally 1–2 hours at room temperature before painting over it.
Working Environment Considerations
Where and when you do your prep and painting matters as much as how you do it. Cold temperatures make paint flow poorly and slow curing, introducing problems with adhesion and finish quality. Aim to work in a space between 60°F (15°C) and 85°F (29°C). High humidity (above 70%) can cause blushing in lacquers — a milky cloudiness in the clear coat. Dust in the air will settle in your wet paint and create surface nibs.
The ideal workspace is a garage or basement with the door or window open for ventilation, temperature in the mid-60s to mid-70s Fahrenheit, and the floor swept and damp-mopped to trap dust. Lay the board on sawhorses so you can walk around it freely. Good overhead lighting from multiple angles helps you see the surface profile and catch any areas you’ve missed.
| Topsheet Type | Min. Sanding Grit | Primer Required? | Extra Steps |
|---|---|---|---|
| ABS Plastic | 220-grit scuff | Yes — plastic adhesion primer | Adhesion promoter spray optional but recommended |
| Fiberglass | 220-grit | Yes — epoxy primer or spray primer | Wear N95 mask during sanding; fiberglass dust is hazardous |
| Wood Veneer | 180-grit with grain, then 220 | Yes — wood sealer or shellac first | Seal the grain before color coat to prevent bleed-through |
| Paulownia / Bamboo | 180-grit, then 220 | Yes — shellac or sanding sealer | Bamboo may need light grain fill for smooth finish |

3M ScotchBlue 2090 Painter’s Tape (Multi-Width Pack)
The industry standard for clean paint lines on complex curved surfaces. Stays put for up to 14 days without leaving adhesive residue on your board edges.
Check Price on Amazon →5. Spray Paint Method: Step-by-Step
Spray painting is the most popular DIY snowboard repaint method for good reasons: it’s fast, accessible, the materials are available at any hardware or art supply store, and with a little practice you can achieve remarkably clean, professional-looking results. It’s particularly well-suited to solid color backgrounds, fades and gradients, and stencil-based graphic work.
Choosing Your Spray Paint
Montana Cans (MTN 94, MTN 400, Montana Black): The gold standard for custom board art. These are artist-grade paints with flexible binders and excellent color saturation. They have a notably different valve system than cheap hardware store cans — the flow is controllable and consistent. More expensive ($8–$15 per can) but the quality justifies the cost.
Rust-Oleum 2X Ultra Cover / Rust-Oleum Painter’s Touch: The best widely available hardware store option. Good flexibility, decent color range, and the 2X formula bonds well to prepared plastic surfaces. $5–$8 per can and widely available at any hardware store.
Automotive Urethane Rattle Cans (Dupli-Color, SEM): Very durable, good flexibility, excellent for topcoats and solid-color base coats. Slightly more expensive at $10–$18 per can but the durability per dollar is excellent for boards that will be ridden hard.
Core Spray Technique Principles
Full Spray Paint Process
Prep and Primed Board Ready
Starting from your fully prepped and primed board. The primer surface should be dry, uniform, and matte. Temperature 65–80°F. Board on sawhorses. Edges and inserts masked.
Apply First Color Coat (Tack Coat)
Hold the can 10 inches away and apply a very light “tack coat” — not full coverage, just a dusting that barely changes the surface color. This creates a slightly tacky foundation for subsequent coats to bite into. Flash time: 5–10 minutes.
Apply Second Color Coat (Build Coat)
Now apply a fuller coat — steady passes, 8–10 inch distance, 50% overlap between passes. The surface should be getting close to full coverage but you may still see primer showing through. Flash time: 10–15 minutes.
Apply Third Color Coat (Final Build Coat)
Final color coat to achieve full, even coverage. Check the surface from a raking angle — any thin spots will be obvious in angled light. Address any coverage gaps before moving on. Flash time: 15–30 minutes.
Add Graphic Elements (Optional)
If adding stencils, tape designs, or freehand spray work, do it now over your fully covered base coat. Let each stencil layer flash completely before masking over it for the next layer. Work from light to dark colors for best results.
Remove Tape and Allow Full Cure
Remove masking tape slowly at a 45-degree angle while the paint is still slightly tacky. Let all color coats cure fully — minimum 2 hours, overnight preferred — before applying clear coat.
Apply 3–4 Coats of Flexible Clear
Apply clear coat in the same thin-coat technique as your color coats. The final coat can be slightly heavier for maximum gloss. Full cure: 24 hours before light handling, 72 hours before reinstalling bindings, 7 days before regular riding.
Gradient and Fade Techniques
Color fades are one of the most eye-catching effects for snowboards and among the most achievable with spray paint. The basic technique: apply your first color at one end of the board, gradually backing off coverage as you move toward the center. Then apply your second color from the other end, overlapping into the transition zone. The two colors blend in the overlap area to create a gradual transition. Practicing on cardboard before going to the actual board is worth the 20 minutes.
Stencil Techniques
Stencils elevate spray paint work from basic solid-color repaints to genuinely impressive graphic art. Cut vinyl stencils — produced on a Cricut or Silhouette cutting machine — give the cleanest, most precise edges. They adhere to the surface with their own adhesive, preventing paint bleed-under. Tape and paper masking works well for geometric designs, stripes, and graduated effects. Frisket film, used extensively in airbrush art, allows drawing and cutting of complex designs directly on the board surface before painting. Loose stencils and found objects — paper cutouts, leaves, lace fabric — held above the surface and sprayed over create soft-edged, organic layered effects that are difficult to achieve any other way.

SprayMax 2K Glamour High Gloss Clear Coat
Two-component polyurethane clear in an aerosol can. Activate the hardener inside for chemical-cure performance without a spray gun. Automotive-grade durability in a DIY format.
Check Price on Amazon →6. Acrylic & Brush Painting Techniques
For riders who want a more hands-on, traditional artistic approach, brush-applied acrylic painting on a snowboard topsheet offers a level of creative control and fine detail that spray painting can’t match. Think of it as painting a canvas — but a canvas that needs to survive freezing temperatures, mechanical flex cycles, and boot-edge abrasion.
Why Acrylic and Not Oil Paint
Acrylic paint is the correct choice for snowboard brush work for two critical reasons. First, acrylics dry by water evaporation and quickly form flexible, cross-linked polymer films that handle flex — the same flexibility that makes acrylics popular for textile and leather painting. Second, acrylics have excellent adhesion to prepared plastic and fiberglass substrates when a proper primer foundation exists. Oil paints, by contrast, stay flexible for a very long time while curing, never fully harden into a robust film on non-absorbent surfaces, and require solvents for thinning that can be incompatible with your primer and clear coat chemistry.
Best Acrylic Brands for Snowboard Painting
Golden Artist Colors: The professional standard. Golden makes OPEN Acrylics (slow-drying for blending), Heavy Body (thick, textured), and Fluid Acrylics (thin, detail work). All are highly pigmented and dry to a flexible film. Their GAC 900 textile medium — mixed at a 1:4 or 1:5 ratio into paint — dramatically increases film flexibility and durability, making it ideal for boards.
Liquitex Professional: Museum-grade acrylics widely available at art supply stores. Liquitex Soft Body works well for brush detail work on boards. Their glazing medium can be mixed in for translucent layered glazing effects.
FolkArt Multi-Surface Paint: A craft-store acrylic specifically formulated for multi-surface adhesion including plastic. More affordable than Golden and genuinely workable on snowboard topsheets with good primer prep. A solid choice for beginners or budget projects.
Essential Mediums and Additives
GAC 900: Golden’s textile medium. Mixed into acrylic paint, it dramatically increases flexibility and durability of the dry film — ideal for snowboard topsheets.
Flow Improver / Airbrush Medium: Reduces surface tension to help acrylics flow off the brush more smoothly and self-level. Prevents brush strokes from showing in large flat areas.
Retarder Medium: Slows acrylic drying time, giving you more time to blend colors on the surface. Useful for portrait work and organic subjects where smooth tonal transitions matter.
Transferring Complex Designs
If you’re not confident about freehand layout, several reliable methods exist for transferring a complex design onto your prepared topsheet. Carbon paper transfer uses graphite transfer paper between your printed reference and the board surface. Chalk transfer lets you rub the back of a printout with soft chalk and trace directly — the chalk lines wipe off after painting. The projector method — using a pico projector or phone projected onto the board in a dark room — is how many professional custom artists work for complex detailed images. The grid method divides both your reference and the board into matching grids, allowing precise transfer without digital tools.
✓ Brush Painting Pros
- Maximum creative control and fine detail
- No overspray risk to surrounding area
- Easy to fix mistakes while still wet
- No ventilation requirements (water-based)
- Infinitely mixable custom colors
- Works beautifully for portraiture and realism
✗ Brush Painting Cons
- Time-intensive — full artworks take hours or days
- Visible brush strokes require skill to avoid
- Large flat color areas harder to make uniform
- Requires mixing mediums for flex durability
- Drying between layers extends total project time
7. Epoxy Resin Art Techniques
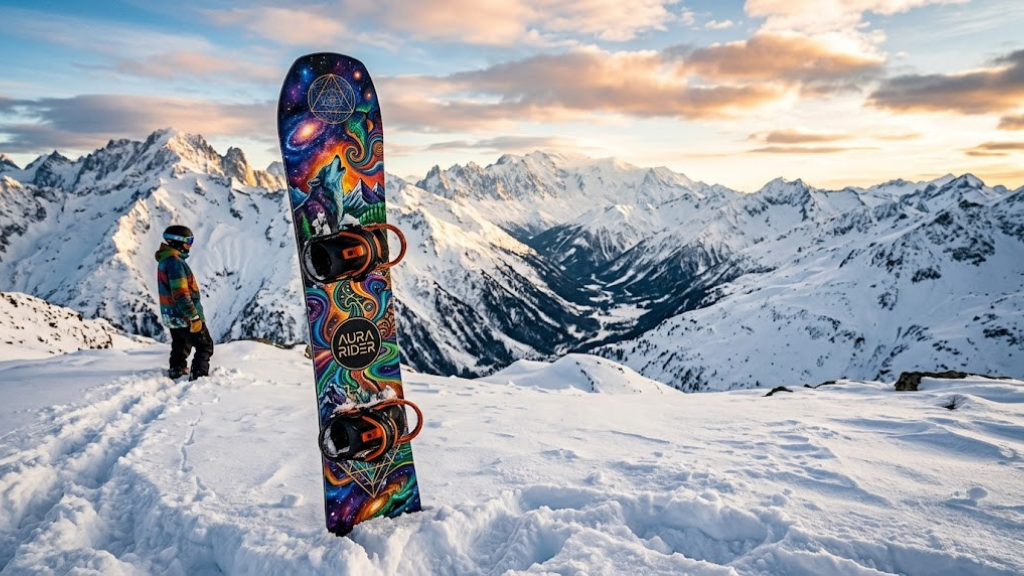
Epoxy resin art has exploded in popularity across multiple creative disciplines over the past decade, and snowboard topsheets turn out to be an ideal canvas for resin work. The self-leveling properties of liquid resin, combined with the ability to embed pigments, metallic powders, alcohol inks, and physical objects, create effects that are simply impossible with any other medium. Resin-painted snowboards have a glassy, three-dimensional depth that stops people in their tracks.
Understanding Epoxy Resin for This Application
Epoxy resin is a two-component system: a resin and a hardener that chemically react when combined in a specific ratio (usually 1:1 or 2:1 by volume). The liquid mixture has a pot life — a working window during which it’s flowable — and then cures to a solid over 24–72 hours. The critical word for snowboard applications is flexible. Standard “rigid” epoxy formulas cure to a completely inflexible plastic. If you apply this to a snowboard topsheet and flex the board, the rigid epoxy layer will develop micro-cracks along the flex zones over time. For boards that will be actively ridden, you need a “semi-flexible” or “soft” epoxy, or a resin system with a high flexibility rating.
Resin Pour Art Step-by-Step
Level the Board Perfectly
Your board must be perfectly level during the pour — liquid resin follows gravity and will pool at the low end of an unlevel surface. Use a bubble level in both the nose-to-tail and edge-to-edge directions. Adjust sawhorse height until the board is perfectly flat in both axes.
Mix Base Resin
Mix your resin and hardener according to manufacturer instructions — exact ratio is critical. Under-mixed epoxy stays tacky forever. Use graduated mixing cups and a wooden stir stick. Mix slowly for 3–4 minutes, scraping the sides and bottom. Switch to a fresh cup and mix for another 2 minutes to eliminate unmixed material from the cup walls.
Add Colorants to Individual Cups
Divide mixed resin into separate cups, one per color. Add resin pigment paste, mica powder, or alcohol ink to each cup. Acrylic paint should not exceed 10% of the resin volume or it can interfere with curing. Pigment pastes and mica powders are always a safe choice.
Pour Colors and Manipulate
Pour colors in your intended design — streams and puddles, tilt the board slightly to move pools, use a low-heat torch or heat gun to manipulate flow. The torch also pops surface bubbles. Keep the torch moving — staying on one spot burns the resin.
Cover and Allow Full Cure
Cover the board with a dust-free tent (a cardboard box works) to prevent dust and hair from landing in the resin during the 24-hour cure. The dust cover is critical — even in a clean room, airborne particles will settle in wet resin.
Resin Techniques and Effects
| Technique | How It Works | Best Colors For | Difficulty |
|---|---|---|---|
| Ocean Wave Pour | White resin dragged over blue/teal base with heat gun to create wave crests | Blues, teals, white, seafoam | Medium |
| Lace / Cell Effect | Silicone oil in one layer, torch to bloom cells through adjacent color | Contrasting complementary pairs | Medium-Hard |
| Geode / Crystal | Sections defined by colored sand and metallic mica borders | Purple, gold, white, black | Hard |
| Galaxy / Nebula | Dark base, metallic powders splattered or brushed into wet resin | Black, deep purple, gold, silver, teal | Medium |
| Embedded Objects | Natural items (leaves, flowers, feathers) encapsulated in resin | N/A — object-dependent | Easy |
For riders thinking about the whole system — not just the topsheet art but the performance picture — it’s worth ensuring your board’s functional components are as dialed as your aesthetics. A one-of-a-kind painted board deserves a complete setup that matches its quality, including thoughtful boot selection appropriate to your riding style.

ArtResin Studio Series Epoxy Resin (32oz Kit)
Non-toxic, non-yellowing, ASTM-certified art resin with a generous working time. UV stabilizers prevent yellowing. Trusted by thousands of custom snowboard and skateboard artists.
Check Price on Amazon →8. Hydro-Dipping a Snowboard
Hydro-dipping — also called water transfer printing, hydrographics, or cubic printing — transfers a printed film design onto a three-dimensional object using the surface tension of water as the carrier. The result is a seamlessly wrapped pattern that covers complex shapes with zero visible seams or distortion, something impossible to achieve with cut vinyl or painted stencils.
The Hydro-Dipping Process Explained
A printed hydrographic film — a water-soluble polyvinyl alcohol film with the pattern printed on one side — is floated on the surface of a tank of water, pattern-side up. An activator chemical is sprayed on the film, which dissolves the PVA carrier and leaves the ink suspended in a thin layer on the water surface. The object — in our case, the snowboard — is dipped slowly through the suspended ink layer. Surface tension ensures the ink wraps around the object and adheres to its surface. The object is rinsed, dried, and clear-coated to protect the ink.
Equipment Required
You’ll need: a water tank large enough to accommodate the board’s full length (a 4–6 foot stock tank works well), water at a consistent temperature of approximately 85–90°F (29–32°C), hydrographic film in your chosen pattern, activator spray, a compatible base coat paint matched to your desired film appearance, and a flexible clear topcoat for protection.
The base coat color underneath the film matters enormously. Hydrographic films are ink films — translucent — and the base coat color shows through and blends with the ink’s colors. A black base coat under a chrome film produces a dramatically different result than a silver base. Most film suppliers provide guidance on optimal base coat colors for each pattern.
| Pattern | Base Coat Color | Visual Effect | Snowboard Style |
|---|---|---|---|
| Carbon Fiber | Gloss black | Technical, lightweight look | Very popular for park boards |
| Woodland Camo | Olive/tan | Military/outdoor aesthetic | Freeride/backcountry |
| Marble / Stone | White or gray | Luxury, sculptural look | All-mountain show boards |
| Ink Drop (Ebru) | White or complementary color | Organic, abstract fluid art | All styles — very versatile |
| Psychedelic / Tie-Dye | White | Retro, colorful, high-impact | Freestyle / expression |
✓ Hydro-Dipping Pros
- Seamless pattern coverage of entire surface
- Unique result — no two dips are identical
- Enormous pattern library available
- Professional-looking results once mastered
- Works on any shape, not just flat boards
✗ Hydro-Dipping Cons
- Requires significant equipment investment
- High failure rate for beginners
- Pattern scale and position hard to control precisely
- Temperature sensitivity — small variations cause defects
- Base coat and activator chemistry must match
9. Vinyl Wraps vs. Paint: The Full Comparison
Vinyl wrapping a snowboard topsheet is a legitimate alternative to painting that offers some genuine advantages — particularly reversibility and speed — while trading off others, primarily longevity under hard use and the inability to achieve certain artistic effects. Understanding where vinyl excels and where paint wins helps you choose the right approach for your specific situation.
Vinyl Wrap vs. Paint: Side-by-Side
| Factor | Vinyl Wrap | Spray Paint | Brush Paint | Resin Art |
|---|---|---|---|---|
| Reversibility | ✓ Fully reversible | ✗ Permanent | ✗ Permanent | ✗ Permanent |
| Application Time | ✓ Hours | Days (incl. cure) | Days–Weeks | Days–Weeks |
| Surface Prep Required | Minimal | Extensive | Extensive | Moderate |
| Durability (All-Mountain) | Good (2–4 seasons) | Very Good (2–5 seasons) | Good (2–4 seasons) | Excellent (3–6 seasons) |
| Durability (Park/Rails) | Poor — rail contact peels vinyl | Fair | Fair | Good if correctly applied |
| Design Flexibility | Very High (digital print) | High | Very High | Very High |
| Cost (DIY) | $40–$100 | $30–$80 | $20–$60 | $60–$150 |
| Warranty Impact | None (reversible) | Yes — voids warranty | Yes — voids warranty | Yes — voids warranty |

3M 1080 Series Cast Vinyl Wrap Film (5ft x 4ft)
Professional automotive cast vinyl with air release technology. Repositionable up to 24 hours after application. Available in 100+ colors including matte, satin, gloss, and carbon fiber.
Check Price on Amazon →10. Sealing & Clear Coating: Making It Last
The clear coat is the unsexy, underappreciated hero of the entire snowboard repaint project. Once you’ve poured your heart into a custom design, the clear coat is the protective envelope that decides whether that art survives one season or five. No amount of artistic skill can compensate for a poor clear coat decision.
Clear Coat Chemistry: 1K vs 2K
Lacquer-based clears (1K systems): Single-component systems that dry by solvent evaporation alone. Fast-drying, easy to use from a spray can, and re-soluble (you can sand and re-coat at any time). The downside is that they’re relatively soft in their final cured state with limited chemical resistance. They work for display boards and light recreational use. Many hardware store spray-can clears are lacquer-based.
Polyurethane and epoxy clears (2K systems): Two-component systems where the clear coat cures by chemical reaction when two components are mixed at time of application. The result is a cross-linked polymer film that’s dramatically harder, more scratch-resistant, and more chemically resistant than lacquer. These provide the best durability for boards that will be ridden hard. The SprayMax 2K aerosol system delivers 2K polyurethane chemistry in a convenient DIY spray can — activate the hardener by pressing a pin before use.
Application Sequence for Maximum Durability
Let Paint Cure Fully
Wait at least 2 hours (overnight preferred) for all paint layers to cure before applying any clear coat. Applying clear too soon traps solvents from the paint underneath, causing bubbles, poor adhesion, and potential wrinkling of the color coat.
Light Denib Sand (Recommended)
After paint is fully cured, lightly wet-sand the color coat with 400-grit paper, being careful not to cut through to the primer. This removes any dust nibs and provides mechanical tooth for the clear coat. Wipe clean with isopropyl alcohol.
Apply Tack Coat of Clear
Very light first coat of clear — barely changes the appearance but anchors the subsequent coats and reduces the risk of fish-eyes (craters caused by surface contamination). Flash: 10 minutes.
Apply Second and Third Clear Coats
Full, flowing coats — enough to see the surface “wet out” and go glossy. Let each coat flash fully before applying the next. These build-coats create the film depth that gives the finish its durability and scratch resistance.
Final Flow Coat
A slightly heavier final coat at the limit of the clear’s viscosity — this is the coat that self-levels the most and produces maximum gloss without running. Watch carefully from an angle to catch any runs before they sag and dry.
Full Cure Before Riding
Two-component clear needs minimum 24 hours to handle, 72 hours for light use, and 7 days to reach full hardness. Mounting bindings before full cure can indent the clear coat surface under binding hardware.
Protecting the base and edges during clear coat application is critical. Your edges should already be masked from the color coat stage — extend that tape through the clear coat stage. If any clear migrates onto the base, scrape it off carefully while still flexible, or sand it off once cured. For comprehensive guidance on keeping your board’s performance surfaces in peak condition, see this detailed guide on snowboard edge and base care.
11. Design Ideas & Inspiration for Custom Snowboard Graphics
One of the most exciting stages of a snowboard repaint project is deciding what to put on the board. The blank, sanded topsheet is a canvas with no limits — which can be both inspiring and intimidating. Here are concepts, themes, and approaches organized by style and skill level.
Design Styles by Skill Level
| Style | Method | Skill Level | Time Investment |
|---|---|---|---|
| Solid Color / Colorway | Spray paint | Beginner | 2–3 hours |
| Gradient / Ombré | Spray paint | Beginner–Intermediate | 3–5 hours |
| Geometric / Tape Art | Spray + tape masking | Intermediate | 4–8 hours |
| Stencil Illustration | Spray + cut vinyl stencils | Intermediate | 6–12 hours |
| Hand-Painted Artwork | Brush acrylics | Advanced | 8–24 hours |
| Fluid Resin Art | Epoxy pour | Intermediate–Advanced | 8–16 hours (incl. cure) |
| Airbrush Photorealism | Airbrush | Expert | 20–60+ hours |
Thematic Inspiration
Mountain and Landscape: Silhouettes of iconic peaks, topographic maps, aerial resort views, tree lines at dusk, or abstract interpretations of your favorite zone. These themes age gracefully and feel at home on a snowboard.
Retro and Throwback: 1980s and 90s snowboard graphic aesthetics — bold color blocking, airbrush gradients, geometric shapes, and psychedelic-influenced designs from the sport’s early culture — have had a major comeback. Thick outlines, neon colorways on dark backgrounds, and deliberately “loud” compositions all read as intentional and authentic when executed with care.
Japanese Aesthetic: Ukiyo-e woodblock wave and landscape references, Irezumi tattoo motifs (koi, dragons, cherry blossoms), and minimalist sumi-e brush painting style have all been popular in premium snowboard graphics for decades. Japan’s incredible snowboard culture has deeply influenced how boards are designed and decorated globally, and a board painted in homage to that tradition carries particular resonance on deep Japow days.
Abstract and Geometric: Clean, mathematical abstraction — precisely taped geometric shapes, primary color blocking, Swiss grid-inspired systems — appeals to riders who want something artistic without being illustrative. These designs are also among the easiest to execute cleanly because they don’t require freehand drawing skill.
Street Art Influence: The overlap between snowboarding culture and street art has been productive since the early 1990s. Letter-based pieces, character illustration, stencil portraiture, and graffiti wildstyle lettering all translate well to board canvases. Limited edition collaborations between snowboard brands and street artists demonstrate how potent this intersection can be.
Color Theory Basics for Board Design
High contrast makes designs visible from distance — which matters on a mountain where people see your board from 10 to 50 feet away. Dark backgrounds with bright color elements read best at riding distances. Complementary colors (opposite on the color wheel — orange/blue, red/green, purple/yellow) create the most visual energy and always stop the eye. Consider how the board reads on snow: against white snow, dark-toned boards create more contrast than light-toned ones, and high-saturation colors pop on overcast days when desaturated boards become almost invisible.
12. Common Mistakes to Avoid
Certain mistakes appear repeatedly in DIY snowboard repaint results across online communities. Here are the most critical errors — what they cause, why they happen, and how to avoid them completely.
| # | Mistake | Symptom | Prevention |
|---|---|---|---|
| 1 | Skipping primer | Paint peels from topsheet within weeks | Always use flexible plastic adhesion primer on ABS boards |
| 2 | Painting over dirty surface | Fish-eyes, blistering, poor adhesion | IPA wipe down immediately before every paint layer |
| 3 | Applying thick single coats | Runs, drips, orange peel, cracking | Always use 3+ thin coats with proper flash time between each |
| 4 | Using rigid automotive clear coat | Clear cracks at flex zones within a season | Use flexible clear, 2K urethane, or resin-over-resin systems only |
| 5 | Painting in cold or humid conditions | Blushing (milky cloudiness), poor flow, extended cure time | Work in controlled environment 65–80°F, under 60% RH |
| 6 | Not masking edges and inserts | Paint on edges, paint in insert threads | Mask everything you don’t want painted before any spray work |
| 7 | Rushing the dry/cure time | Wrinkling, solvent pop, poor interlayer adhesion | Respect manufacturer flash and cure times. Then wait longer. |
| 8 | Uneven sanding during prep | Visible low spots, patchy color coverage | Use random orbital sander or change direction every 3 passes |
| 9 | Using oil-based paint | Never fully hardens, stays tacky, cracks under flex | Use only flexible acrylic or urethane-based paints |
| 10 | Rigid epoxy on a flexy board | Micro-cracks in resin after first few rides | Use semi-flexible art resins; check flexibility rating before buying |
| 11 | Reinstalling bindings too early | Binding footprint indented in clear coat | Wait minimum 72 hours (preferably 7 days) before mounting bindings |
| 12 | Skipping the IPA final wipe | Adhesion failures in specific spots corresponding to hand contact | Never touch the primed surface with bare hands; IPA wipe before painting |
Troubleshooting Common Problems
Fish-eyes (craters in the paint): Silicone or oil contamination. Allow the paint to cure, wet sand the affected area flat, reclean with a thorough IPA wipe, and recoat. Adding a small amount of fish-eye eliminator additive to your paint reduces future occurrence.
Runs and drips: Paint applied too heavily or can held too close. Allow to cure, wet sand the runs flat with 400-grit, feather into the surrounding area, and apply a light touch-up coat. Prevention is always easier than repair.
Orange peel texture: Paint atomized from too far away, applied in too cold/dry conditions, or the specific paint’s formula needed adjustment. Can be cut back with 1500-grit wet sanding followed by polishing compound for glass-smooth results, or accepted as a slight texture that actually adds grip underfoot.
Clear coat blushing (milky appearance): Caused by moisture being trapped in the clear coat during application — typically from high humidity or temperature swings. Prevention is critical: work in controlled conditions. If it happens, allow full cure, then wet-sand with 1000-grit and re-clear in better conditions.
Paint chipping at edges: Either inadequate edge masking allowed paint to wrap onto the sidewall where it’s vulnerable, or the clear coat wasn’t thick enough at the perimeter. Touch up chips immediately to prevent moisture infiltration under the paint film.
13. Maintaining Your Custom Paint Job
Once you’ve completed your custom repaint, a few simple maintenance habits will dramatically extend the life of your artwork and keep it looking fresh season after season. A well-maintained repaint can easily outlast factory graphics.
Immediate Post-Ride Care
After each session, wipe the topsheet down with a soft microfiber cloth to remove snow, ice, and grit. This takes 30 seconds and prevents abrasive particles from grinding into your clear coat when the board is stored or transported. If you’ve been riding in slushy spring conditions or on a particularly dirty day, a quick rinse with clean water removes salt and debris that can degrade the clear coat over time.
Storage Best Practices
Store your board in a climate-controlled space away from direct sunlight. UV exposure degrades clear coats and fades colors over time — the same UV that yellows old plastics will do the same to your topsheet. Extreme temperature swings cause the laminate to expand and contract at different rates than the paint, which can contribute to cracking in poorly-bonded paint jobs. A closet, basement, or garage that stays between 40–80°F year-round is ideal.
Store the board either vertically on wall hooks or horizontally on a rack with the bindings off. Leaving bindings mounted during summer storage creates localized pressure points that can indent even fully-cured clear coats over months of static load.
Touch-Ups and Repairs
Small chips and scratches are inevitable with regular riding. Address them promptly to prevent moisture infiltration under the paint layer. For minor chips in the clear coat, a small drop of clear nail polish or the same flexible clear coat you originally used can seal the damage. For deeper chips through to the color layer, match the color with acrylic paint applied with a fine brush, let it cure, then seal with clear.
Keep a record of the exact paints and clear coat products you used. Taking photos of the paint cans and storing unused material makes future touch-ups much easier to color-match.
What NOT to Do
| Don’t Do This | Why It’s Bad | Do This Instead |
|---|---|---|
| Pressure wash the topsheet | High pressure can delaminate edges of paint from the topsheet | Hand wash with soft cloth and water |
| Use abrasive cleaners or brushes | Scratches clear coat, dulls finish | Microfiber cloths only |
| Store in direct sunlight | UV fades colors, yellows clear coat | Indoor storage away from windows |
| Leave wet after riding | Moisture at paint edges can cause delamination over time | Dry with cloth after each session |
| Apply car wax or polish | Some products contain solvents that soften flexible clear coats | If you want extra protection, use plastic-safe detailer spray |
14. Frequently Asked Questions
Take Your Board from Boring to Legendary
You now have everything you need to transform your snowboard into a one-of-a-kind custom work of art. Whether you choose spray paint for speed, brush painting for detail, epoxy for depth, or vinyl for reversibility, the techniques and materials knowledge in this guide will help you achieve professional results on your first attempt. The difference between a paint job that lasts one season and one that lasts five comes down to prep work and material choices — and you now know exactly what to do.
Remember: surface preparation accounts for 80% of success. Use flexible materials designed for the job. Let each layer cure properly. Protect your work with a quality clear coat. Follow those principles and your custom board will turn heads on the mountain for years to come.
Ready to start your project? Scroll back up to grab the materials you need, pick your method, and get started. Your custom snowboard is waiting.


